
Boo! Halloween is just around the corner! The decorations, the costumes, the parties, the treats. It's such a fun time of year for both kids and adults. The decorations, the costumes, the parties, the treats. It's also such a busy time of year for parents and teachers. Don't let your to do list keep you from joining in on the fun of the season. This yummy Halloween treat can be made in just minutes and is sure to make your kids … [Read more...]
Rainbow Unicorn Pudding Parfait
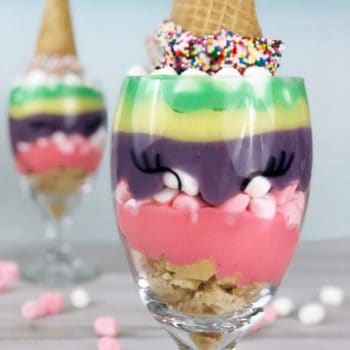
Calling all rainbow and unicorn lovers! Have you seen all the cute unicorn themed desserts all over Pinterest? They are crazy cute but way too hard for me to make. That's why I love this rainbow unicorn pudding parfait recipe--it's both simple and adorable! Rainbow Unicorn Pudding Parfait Cups Supplies: Glass or plastic cup or goblet Sharpie Directions: Use the sharpie to draw simple eyes on the cup. This can be washed … [Read more...]
20 Edible Activities for Kids To Do

What makes kids crafts more fun? Edible activities for kids to make and taste! You can make edible crafts to beat boredom, work on fine motor skills, celebrate a special day or to just make some memories bonding in the kitchen with your kids! Taking into account that everyone has different ideas on what's fun and easy when it comes to crafting (especially with food!) we've included a variety of different ones below. Painted toast and peanut … [Read more...]
Rainbow Jell-O in a Jar Recipe
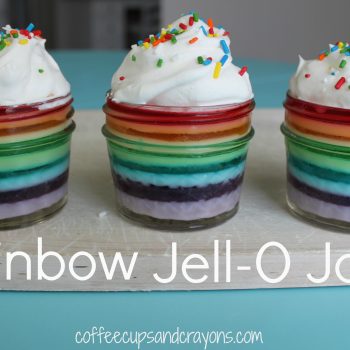
Rainbow Jell-O Jars are a fun way to brighten anyone’s day! They are the perfect treat for St. Patrick's Day, birthdays, holidays, rainy days, and sunny days—you can’t go wrong with anything rainbow colored. Rainbow Jell-O Recipe Ingredients: 6 small boxes of Jell-O in rainbow colors 2 cups of sour cream or Greek yogurt Boiling water and cold water Whipped cream Colored sprinkles Dozen 4 ounce jelly jars (we used the wide … [Read more...]
How to Make Ice Cream in a Coffee Can

Making your own ice cream is so much fun for kids! Last year we made ice cream in a bag and it was a huge hit. This year we tried something new and made ice cream in a coffee can! Ice Cream in a Coffee Can: 1 small clean coffee can 1 large clean coffee can (ours held 3x the amount of the small one) 1 cup of milk 1 cup of half and half 1/2 cup of sugar 1/2 tsp vanilla 1 1/3- 1 1/2 cups of ice cream salt crushed ice duct … [Read more...]
Super Cute Granola Gorilla Snack for Kids

"We need to make these granola gorillas RIGHT NOW!" To say that my kids were excited about the new book Wild Eats and Adorable Treats by Jill Mills is an understatement. A big understatement. They filled the book with post-its marking off all of the recipes they wanted to make, but all agreed the granola gorillas were too cute not to make first! Affiliate links included below. Making fun snacks and meals is a great way to connect with your … [Read more...]
How to Make the Best S’mores Ever!

Making s'mores is a summertime staple--whether you are going camping or hanging out in your backyard everyone loves to make s'mores. We have been trying out different s'mores techniques and recipes the last couple of summers and my kids are convinced that we now know how to make the best s'mores ever! (Affiliate links included for reference!) Best S'mores Recipe Honey Maid Original Graham Crackers Jet Puffed Marshmallows Ghirardelli … [Read more...]
Orange Craft and Snack for Preschool

Colors are one of the most fun preschool topics to explore! We came up with a simple snack and orange craft idea to teach preschoolers the color orange that is sure to make you smile. Orange Snack for Preschool oranges googly eyes edible food markers glue or glue dots Making healthy food fun is a great way to get kids excited about eating it. We turned our oranges into people and since we just decorated the skin they were still … [Read more...]