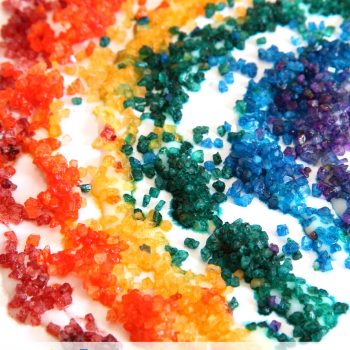
Art can be a great way for kids to create and learn by using their senses. There is so much sensory input that happens with art creation! Sticky glue, the scent of paints, tearing paper, cutting resistive materials...art is a sensory-filled experience! This Scented Sensory Rainbow Art project provides even more sensory fun with DIY dyed bath salts. The scent of coconuts washed over us as we created, and wow. Was this art project ever fun! Create … [Read more...]
Rainbow Color Sorting Busy Bag
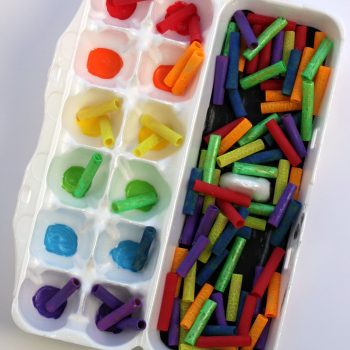
Spring is almost here and I am ready for all things rainbow! We came up with a fun rainbow color sorting busy bag that is so simple to put together. Rainbow Color Busy Bag egg carton paint food coloring (optional) pasta The best thing about this busy bag is just how easy it is to put together! We didn't have enough food coloring to dye all the pasta so we half dyed, half painted ours. As long as you color it somehow you will be … [Read more...]
Rainbow Jell-O in a Jar Recipe
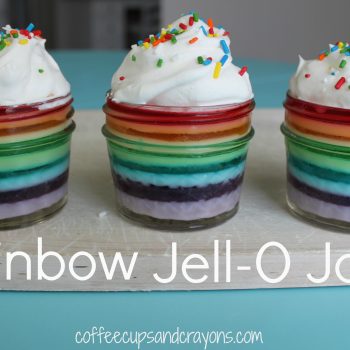
Rainbow Jell-O Jars are a fun way to brighten anyone’s day! They are the perfect treat for St. Patrick's Day, birthdays, holidays, rainy days, and sunny days—you can’t go wrong with anything rainbow colored. Rainbow Jell-O Recipe Ingredients: 6 small boxes of Jell-O in rainbow colors 2 cups of sour cream or Greek yogurt Boiling water and cold water Whipped cream Colored sprinkles Dozen 4 ounce jelly jars (we used the wide … [Read more...]
Shamrock Math Race

This time of year, we are stuck indoors a lot. With cold weather outside, we need active gross motor games for the kids. When learning is mixed in, it is just a bonus for this mom! We made this Shamrock Math Racing Game one cold afternoon, and now we can't stop playing! We started with a package of glittery shamrocks that we had picked up one day at the Dollar Store. I added a large foam dice and our game was ready. This is an easy set-up … [Read more...]
Celery Science Experiment for Kids
I love easy experiments that make science cool! This rainbow colored celery experiment is simple to set up and really makes transpiration come alive for kids. Celery Science Experiment celery (the leafy parts show the color the best) jars water food coloring We have been doing a lot of rainbow activities lately so we made our water rainbow colored by mixing colors. It was a fun way to extend the learning for my preschooler, but … [Read more...]
Measuring Leprechaun Pots Math Activity

I am so excited to have Malia from Playdough to Plato here today with a fun math activity for you! 'Tis the season for rainbows, shamrocks and pots of gold so I was excited to pull together a fun, St. Patrick's Day math activity for my four year old. Measuring Leprechaun Pots gives kids plenty of practice measuring (that one's pretty obvious) but it also teaches them how to compare lengths. To Prep I grabbed a pack of construction paper, a … [Read more...]
Fun Rainbow Food For Kids

Rainbow activities are everywhere right now! An easy way to add to the rainbow fun is with colorful rainbow snacks. I've added a list of rainbow foods that are kid-friendly, look super yummy, and quite pretty! Inviting your kids into the kitchen to help whip up a batch of rainbow waffles or rainbow fruit kabobs are great ways to encourage trying new foods. And I don't know anyone who could turn down a rainbow treat! Rainbow Snacks for … [Read more...]
5 Ways to Make St. Patrick’s Day Fun for Kids

My husband and I love St. Patrick's Day and are always looking for ways to make it fun for our kids! It's the silly ideas that make everyone smile that become great family traditions and memories down the road. Here are 5 super easy ways to make St. Patrick's Day fun for kids! Leprechaun Fun for Kids: 1. Make your own leprechaun trap to try and catch a leprechaun! This is not only a great way to stop any leprechauns from causing trouble it … [Read more...]